
 Angular SSR (Server-Side Rendering)


This post will be a complete practical guide for getting started with Angular Universal.
We are going to go start with an existing Angular application, and we will progressively turn it into an Angular Universal application while explaining every step along the way!
We will first learn about the main use cases for Angular Universal, so that we know when to use it and why.
Then we will start by using the Angular CLI to quickly add an Universal bundle to an existing application. We will then write step-by-step our own Angular Universal Express Server from scratch!
We will make our application search engine (SEO) friendly and compatible with social media crawlers (for example Facebook or Twitter).
We will then show how to implement a couple of commonly used Angular Universal performance optimizations:
-
we will implement a fine-grained Application Shell for selectively server-side render only some of the content (depending on the page)
-
we will further optimize the application startup experience by leveraging the Angular State Transfer API
Table of Contents
In this post, we will cover the following topics:
- What is Angular Universal?
- How does Angular Universal Work?
- Why Angular Universal? - Reason 1: Performance
- Why Angular Universal? - Reason 2: Search Engine Optimization (SEO)
- Why Angular Universal? - Reason 3: Social Media Crawlers
- Does the Google Search Engine index well Single Page Applications?
- Scaffolding a Universal bundle using the Angular CLI
- Pre-Rendering our Application using the Universal bundle and
renderModuleFactory() - Implementing an Angular Universal Express Server from scratch
- Optimizing our Angular Universal application for SEO (Search Engine Optimization)
- Integration with Social Media Crawlers using Angular Universal
- Implementing a fine-grained Application shell using custom structural directives
- Leveraging the Angular State Transfer API
- Code Sample (Github Repo)
- Conclusions
So without further ado, let's get started with our Angular Universal deep dive!
What is Angular Universal?
In a nutshell, Angular Universal is a Pre-Rendering solution for Angular.
To understand what this means, let's remember that in a normal single page application, we usually bring the data to the client and then build the HTML that represents that data last second on the client side.
But in certain situations and by good reasons, we might want to instead do that rendering ahead of time, for example on the server or at application build time: and that is exactly what Angular Universal allows us to do.
How does Angular Universal work?
When we use Angular Universal, we will render the initial HTML and CSS shown to the user ahead of time. We can do it for example at build time, or on-the-fly on the server when the user requests the page.
This HTML and CSS will be served initially to the user, so the user can see something on the screen quickly. But server-side rendering is only half the story!
This is because together with the server-side rendered HTML, we will also ship to the browser a normal client-side Angular Application.
This Angular client application will then take over the page, and from there on everything is working like a normal single page application, meaning that all the runtime rendering will occur directly on the client as usual.
This will likely lead you to the question: when would we want to use Angular Universal, and why?
Why Angular Universal? - Performance
There a couple of reasons for using Angular Universal in our project, but maybe the most common reason is to improve the startup performance of our application.
As we know, a single page when initially loaded is essentially an empty index.html file with almost no HTML. This means that when this HTML file gets initially rendered by the browser, all that the user will see is a completely blank screen!
Let's have a look at an example using the Chrome Dev Tools performance tab. This is what we typically see in an Angular application running locally:
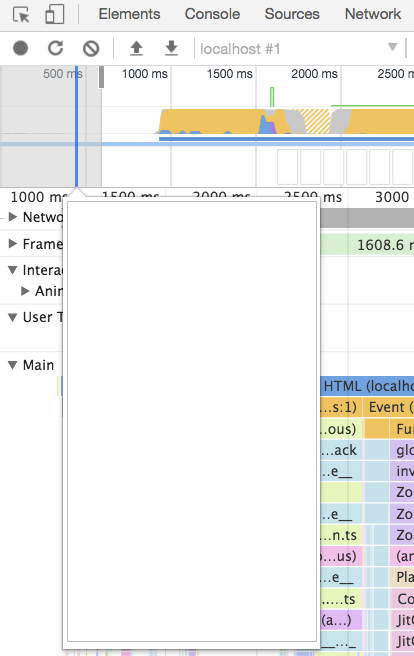
As we can see in the screenshot popup of the performance tab timeline, the application starts off as a completely blank page.
Depending on the application, this could go on for several seconds. But the problem is that:
53% of all users abandon an application if it takes longer than 3 seconds to load!
So clearly this initial delay in showing something to the user makes a huge difference in terms of user experience.
If you want a more detailed explanation about how to use the Chrome Dev tools to measure how long your application stays in this blank state, have a look at this video:
Server-side Rendering and User Experience
With Angular Universal, instead of a blank index.html page we will be able to quickly show something to the user, by rendering the HTML on the server and sending that on the first request.
The user can then see some initial content much faster, which improves a lot the user experience (especially on mobile), giving us an important use case for server-side rendering.
But there are also other good reasons for using server-side rendering other than performance.
Why Angular Universal? Search Engine Optimization
Another reason for doing server-side rendering is to make our application more search engine friendly.
Today, most search engines take the title and description shown in search results from metadata tags present in the header section of the page.
For example, here are the search results for an "Angular Universal" Google search:
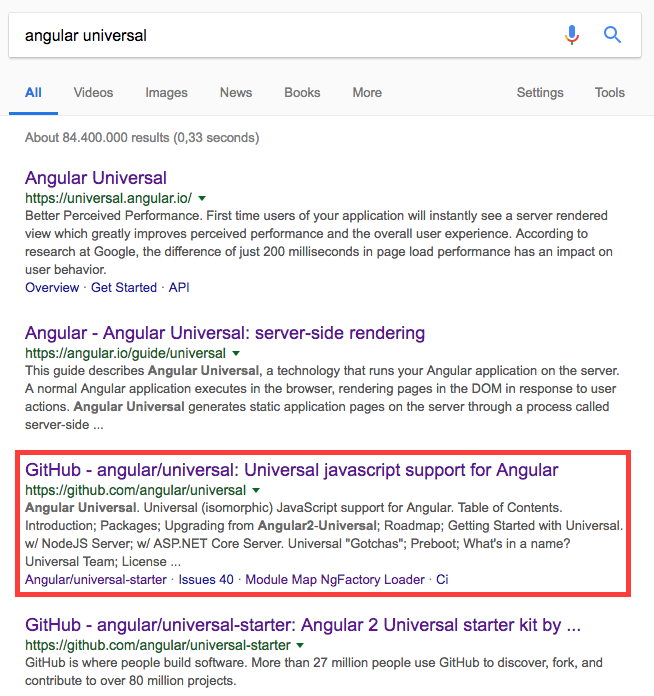
Where do these page titles come from?
All the blue link titles that we see in these search results are being filled in based on metadata tags present on the pages they link to.
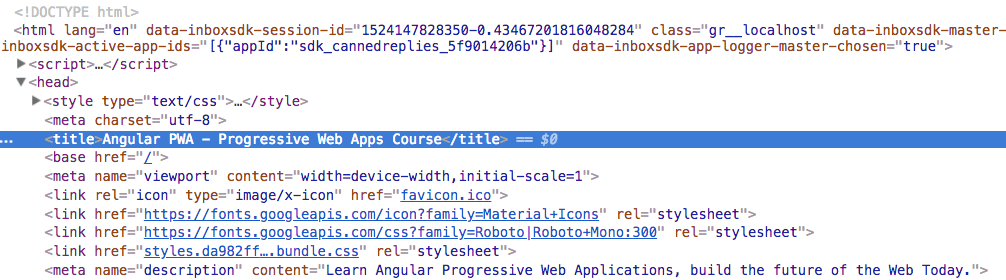
For example, the title for our third search result (highlighted in red) can be found in a title HTML tag, present inside the head section of the result page:

As we can see, the content of the title HTML tag highlighted in blue corresponds to the title of highlighted entry in our search results.
What do search engines expect to find in a page?
Most search engine crawlers expect these important SEO meta tags to be present on the HTML returned by the server, and not to modified at runtime by Javascript.
And this is the same for the remainder of the page content, most search engines will index only the content that comes back from the server directly, and not what get's loaded using Javascript.
So having our page server-side render those metadata tags is essential for ranking correctly in a lot of search engines.
However, that is not the case for the Google search engine!
Does the Google Search Engine index well single page applications?
Currently, the Google search engine indexes correctly most Javascript pages, and a good proof of that is the Angular Docs site, which is itself an SPA built with Angular.
The Angular Docs site indexes perfectly for long queries that target content that is loaded dynamically via Javascript. The website even populates the title and description meta tags dynamically using Javascript (we will do that too), and those get shown in the search results with no problem.
If you want to try this out and see for yourself, simply take a long string from any page in the Angular Docs website and search for it: here is an example:
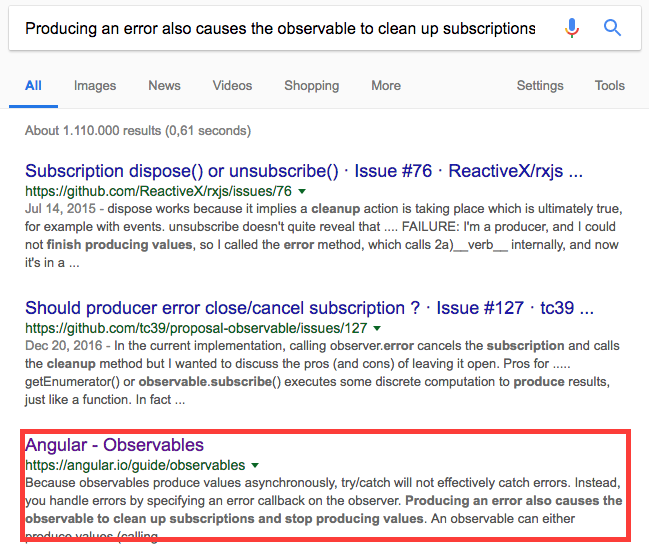
As we can see, the Angular Docs SPA ranks perfectly for this very long search query on Google, even though all its content was loaded dynamically by Javascript.
Do all search engines index Javascript?
But what happens if we do the same search on other search engines? Have a look here at the Bing search results for the same query.
As we can see the same Angular Docs result that is in third place on Google does even not rank on Bing, as Bing currently does not index dynamic Javascript content, and the same is true for many search engines including DuckDuckGo and others.
Is SEO still a key reason for using Angular Universal?
If we are targetting only the Google search engine, as we have shown there is no need to server-side render our content in order to have it ranked correctly, as Google can today index correctly most Javascript-based content.
On the other hand, if we want to target all search engines, then server-side rendering is a must as we can see in Bing search results.
Let's now cover one last reason for using Angular Universal: Social Media crawlers.
Why Angular Universal? Social Media Crawlers
The same way that search engines will crawl our pages looking for titles and descriptions, social media crawlers from platforms like Twitter will also do something very similar.
Whenever we post a link to social media, the social media platform will crawl the content of the page, and it might try to extract some information about the page to make the post look better.
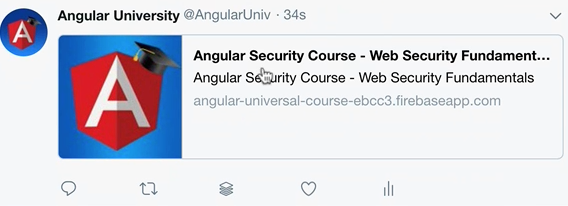
Here is an example of a Twitter post improved by the Twitter crawler:
Social Media benefits of server-side rendering
The tweet originally contained only the text and the link, but the Twitter crawler managed to extract a picture, a title, some text and it built a summary card based on the page content.
In order for the Twitter crawler to be able to build this card, we currently need the application to be server-side rendered and fill in some special meta tags (we will show how to do that).
So that is another reason for using Angular Universal: improving the social media presence of our application. And with this, we now have a good understanding of when to use Angular Universal and why!
Let's then start using Angular Universal in an existing Angular Application.
How to add Universal rendering with the Angular CLI
Our starting point will be an existing Angular application that already uses the Angular CLI (available in this Github branch).
Let's then start by adapting the application to enable it to build an Angular Universal bundle. We can quickly add an Universal bundle to our application by running the following Angular CLI command:
ng generate universal --client-project <name of your client project>
What is the Universal bundle, how does it work?
This new application when built is going to build a main.bundle.js file, and that is the Universal bundle.
This bundle contains essentially the same application as the client application, but the Angular rendering layer has been swapped out via dependency injection.
Instead of using the same rendering layer as on the client (which produces DOM directly), we will use a server-side rendering layer. The server-side rendering layer will output plain HTML in text form, and not DOM.
To understand what this bundle contains, let's have a look at what this command did in the file system, and review the changes one by one.
Configuration for the new Universal Bundle
One of the main things that the previous CLI did was to add a new build target to our angular.json build configuration file:
The differences towards the client side app are just a couple of properties, namely:
- this application has a different entry point:
main.server.ts - this build uses a separate Typescript configuration file:
tsconfig.server.json - the build output is going to the
dist-serverfolder, instead of thedistfolder - this application is going to use the rendering layer available in
@angular/platform-server - The build output of this new CLI application will the Universal bundle itself
How does this new Universal Application Work?
To understand how this new application works, let's have a look at the application entry point main.server.ts:
As we can see, this is very similar to the entry point of the client side application. But instead of exporting the client application root module AppModule, we are instead exporting the newly generated AppServerModule.
Let's then have a look at this new AppServerModule:
As we can see, this new server root module is importing the AppModule client root module, plus ServerModule from platform-server.
This means that this new server-side application will have the exact same set of application-level components and services as the client application, but with the difference that several Angular internal services are being swapped out via dependency injection, namely the renderer.
Other than that, the two applications are exactly the same, they just have different rendering layers and use different implementations of certain services.
How to Build the Angular Universal Bundle?
Let's then go ahead and build the Universal bundle, and see how we can use it to quickly pre-render the main route of our application.
We will need the production version of the Universal bundle, as the development bundle will not work. So let's go ahead and generate it using the following command:
ng run your-project-name:server
This command will generate a bundle.js in the dist-server folder: this is our Universal bundle, that we will be using to pre-render our application in a moment.
Pre-Rendering our Application using the Universal Bundle
The best way to understand how Angular Universal works is to simply take the universal bundle and use it to output, for example, the main root route of our application.
Let's then build a small command line tool to pre-render the HTML of our main HTML route, and output it to a text file. From there, we will easilly build the Express Server.
Our program will be a file named prerender.ts, located in the root folder of our application.
In order to pre-render the application main route, our program simply calls the function renderModuleFactory(), which is the heart of the Angular Universal pre-rendering solution.
Here is what our program will look like:
How to call renderModuleFactory()
Let's then break down what is going here. Among a couple of imports needed to make Universal work in a node environment, we are also importing the application root module factory from the universal bundle:
The application root module factory object (named AppServerModuleNgFactory)
is one of the main outputs of the build process, and contains all the information necessary for rendering the application on the server.
We are then going to take this module factory, and use it to render the application by calling renderModuleFactory(). Besides it, we will also pass to the function a couple of extra properties:
Choosing what document to render using the Universal Bundle
The document property is a string containing the template that we want to render. In this case, we want to render the application root component, so our template simply contains the root component and nothing more:
<app-root></app-root>
This component will internally contain different many components depending on the state of the router, so we also need to pass as an argument which route do we want to render via the url property.
In this case, we will be rendering the root route (/). And believe it or not, using Angular pre-rendering is that simple!
If we now run this program, a file named prerender.html is going to be generated that contains the result of this rendering process.
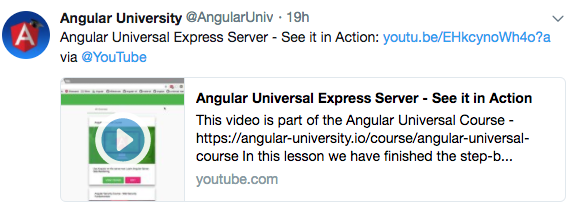
To see a video version of what we have done so far, have a look at this YouTube video:
Running our Pre-Rendering command line utility
If you would like to run this program and see what the output looks like, you can find a running version in this Github branch.
In order to run our command line utility, let's go ahead and use ts-node:
ts-node ./prerender.ts
After a moment, this will generate a new prerender.html output file, which contains the output of calling renderModuleFactory().
Here is what the content of the file will look like:
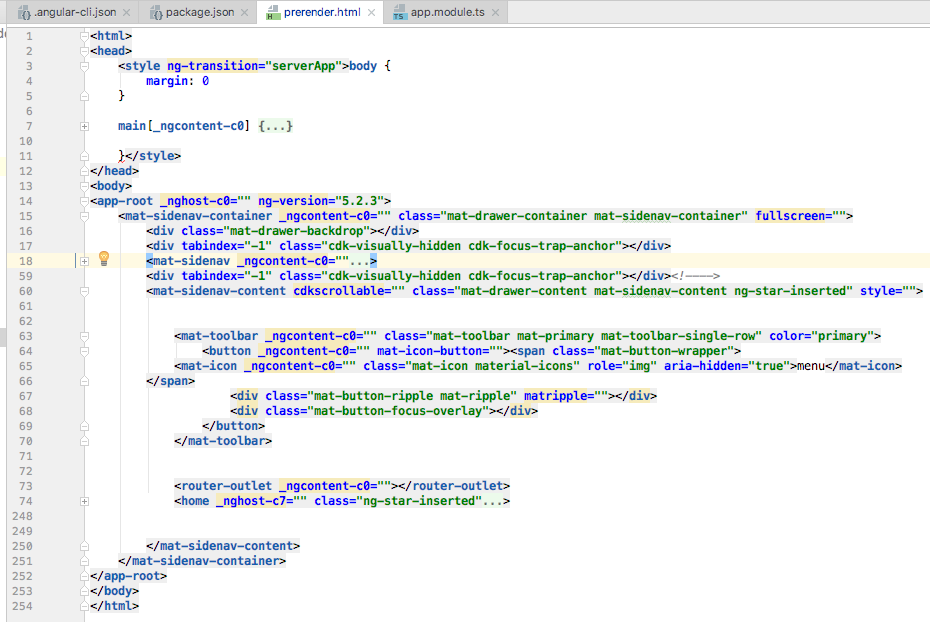
As we can see, there is a lot of HTML and CSS here (254 lines), all of this generated from the initial template <app-root></app-root>!
During rendering, the Universal bundle queried the server, retrieved the data and rendered everything out to plain HTML as expected.
If we now open the prerender.html file in a browser, here is what it will look like at this stage:

As we can see, the HTML for the main route of the application is there with all the data queried from the server, but we still have a lot of styles missing.
Also, this page is a static HTML page, there is no Angular application up and running after opening this file!
This is because we have only rendered the HTML for the <app-root> element, but our universal application is more than only the HTML of the root component. Server-side rendering is really only half the story.
Why we also need the frontend build
In order to have a running application, we need to serve to the browser not only the HTML of <app-root> but also the whole CSS and the client-side application that is going to take over the page after all resources are loaded.
We want to use as the basis for our rendering more than just the <app-root> component, we want to add also all the script and link tags that will load all the application styles plus the client-side app.
And we have all those tags plus the <app-root> component in one single place: the client side index.html file!
This means that we will also need the output of the client-side build as well, so let's go ahead and generate that:
ng build --prod
Let's have a look at all the build assets that we have at this point. We have two folders, one for the client build and the other for the universal build:
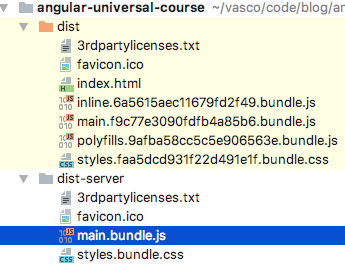
Let's take a look at the one specific resource, the production index.html which is inside the dist folder:
This file contains everything that we will need to produce a server-side rendered page:
-
we have the
<app-root>tag, that contains the whole application -
the complete CSS of the application is getting loaded
-
the client-side application is getting loaded via a couple of script tags
So let's go ahead and see how using these assets we can piece together an Angular Universal Express Server.
Angular Universal Express Server (from scratch)
At this point, we have already written the most important part of the server! The server will resemble closely the small command line utility that we just wrote.
If you are curious to see what the server looks like, here is the complete implementation in one go:
But there is a lot going on in this code snippet. So let's break this down step-by-step, starting with the script initial part:
As we can see, this is very similar to the beginning of our pre-rendering command line utility:
-
we are also importing here the production universal bundle
main.bundle.jsfrom thedist-serverfolder -
we are then enabling the Angular production mode, to avoid having the application go twice through its change detection phase (see here for more details on the Angular Production Mode)
-
we then initialize our Express Server
-
the last preparation step is to read the production
index.htmlpresent in thedistfolder, and load it into a string
After these initialization steps, let's go straight into the main part of the implementation itself.
Express Middleware for Universal Rendering
We are going to start by defining an Express middleware that intercepts all HTTP requests that reach it.
Let's say that for example the user types in the url bar the address http://yourdomain.com/courses/03: this request would hit our server and it would end up reaching this middleware.
This middleware will then define what response should be sent back to the browser:
How does the Universal Middleware work?
As we can see, the wildcard * means that this is indeed a catch-all middleware.
Inside this middleware, we are checking which route do we need to render by checking the req.url property.
With that, we are going to server-side render our application by calling renderModuleFactory() just like before. But unlike before, we are now using our production client-side index.html as our rendering template!
Notice that this file will never be served as a static file by out Express Server, its only used as the base template for server-side rendering.
Also unlike before, instead of writing the output to a text file, we are going to instead send it back to the browser, by passing it as the request response body:
res.status(200).send(html);
We are also doing some error handling, sending back a 500 Internal Server Error in case of error:
res.sendStatus(500);
Trying out our Universal middleware
And with this, we have built the HTML response to the initial browser request http://yourdomain.com/courses/03. And here is what the response looks like:
This file contains a lot of HTML and CSS, plus several CSS and Javascript bundles.
Serving the static CSS and Javascript client bundles
This response will then reach the browser. The browser will then parse the HTML and it will eventually find the multiple link and script tags.
For each of those, the browser is going to request the linked files to the server.
For example, this tag will trigger a request to fetch the file mentioned in the src property:
This file needs to be served as a plain static resource by the Express server, so for that, we need to add a middleware to serve these files, before the request hits our catch-all (*) middleware.
All the requests for static bundles end with an extension (*.js, *.css), so let's add a middleware targeting requests containing one dot in the url using *.* :
This middleware is defined before the server-side rendering middleware, and it will serve the static bundles from the dist client-side build output folder, in case there is a file in the dist folder that matches the request.
Otherwise, if the request does match a static resource, then the catch-all middleware (*) is still going to be triggered.
But otherwise, if a static bundle is found that matches the resource, then the middleware chain is interrupted and the server-side rendering middleware (*) will no longer be triggered.
Finishing up our Universal Express Server
The last part of the puzzle is to launch the Express server, by listening for HTTP requests on port 9000:
And with this we now have completed our server! Let's now have a look at the end result. Let's start by running our server locally using ts-node:
ts-node ./server.ts
We should now see this in the console:
Angular Universal Node Express server listening on http://localhost:9000
If you want to run the server locally and see it in action, you can find the running application in this Github branch.
And here is a screenshot of the running application:

Angular Universal SEO - Search Engine Optimization
Let's now go ahead and start optimizing our application for SEO. We will go ahead and set the title tag and description for example for the Course page.
And notice that we can adapt the SEO metadata depending on the page that we are currently on.
In this case, we would like to set the title tag of the page to the title of the course and populate also the description meta tag. We can do that using the Title and Meta services:
How do the Title and Meta services work?
What these services will do is they will set the title and description tags depending on the environment that they are running.
On the server, these services will simply render the tags as plain strings, while on the client they will update the title and meta tags directly in the DOM at component startup time.
Let's remember, the Google Search Engine will be able to use a client-side rendered title and description meta tags, but this is not true for all search engines.
For other search engines, it's essential for SEO to render these tags directly on the server. Using these two services, this is what the title and description will look like at runtime:
If you would like to see the same application with these meta tags populated, have a look at this branch of the sample repository.
Integration with Social Media Crawlers
In a similar way to what we did with the SEO meta tags, we can also add other tags that will be used by social media crawlers to help configure what the page will look like on social media.
For example, let's make the course page look better on Twitter, by configuring a Twitter summary card:
The twitter crawler now has all the necessary information for creating a summary card for this page, producing a tweet for a course that looks like this:
Why a Fine-Grained Universal Application Shell?
With our application up and running, we are now going to implement a couple of performance optimizations that are usually used together with server-side rendering.
As it stands, our application will initially render all the content on the server, without exception. Depending on the situation, this might even be counterproductive from a performance standpoint.
Imagine a page where there is a lot of data that is scrollable below the fold: it might be better to conditionally render only some of the data that the user sees above the fold on the server, and then take care of the rest on the client after the application bootstraps.
What is an Application Shell?
Let's remember that we are doing server-side rendering for making sure that we show something quickly to the user as soon as possible, so sending him a huge amount of HTML might not the best way to do that, depending on the page.
What we want to do is to send some HTML instead of a blank page, but maybe not all the HTML initially.
This initial HTML that we send to the user is known as an Application Shell, and it might be as simple as a top menu bar and a loading indicator, but it might be much more depending on the page.
How to choose what gets rendered or not?
In order to produce the optimal amount of HTML on the server for the best experience, what we need in this scenario is some fine-grained control over what gets rendered or not on the server.
We are going to implement that using a couple of custom structural directives: appShellRender and appShellNoRender.
First of all, let's see how these directives will be used. For example, on the main component, we might want to conditionally render a loading indicator using appShellRender:
This means that a rendering indicator will be added to the bottom of each page, but only if the rendering occurs on the server.
Choosing what get's rendered per container component
Then, inside each top-level component, we are going to specify what get's rendered on the server or not. For example, on the course page we might only want to server render the course title and the thumbnail, but not the lessons list.
We can configure that by applying the appShellNoRender directive to the element that we want to skip while rendering on the server:
Notice that the appShellRender and appShellNoRender have no effect on the client! In the browser, the whole template will be rendered each time as we navigate through the single page application.
Implementing a fine-grained App Shell
Now that we know how these two App Shell directives will work, let's see how they are implemented. Let's start by having a look at appShellRender:
As we can see, this is a typical custom structural directive. We can tell this because we are injecting viewContainer and templateRef like we always do for structural directives.
The template reference (templateRef) points to the template snippet onto which the directive has been applied. For example, in the case of the loading indicator where we applied appShellRender, this is the template getting injected:
Another thing that we are injecting in our structural directive is platformId, that we can use to determine if the directive is being used on the server or on the client.
Then the conditional rendering logic is implemented in this snippet:
This logic essentially means: "render the target template but only if we are on the server. If we are on the client, then don't render this element".
The companion directive appShellNoRender works in a very similar way. Here is its complete code for reference:
With this couple of simple directives, we can already do a lot in terms of selectively rendering on the server only certain parts of the application.
These two directives are a good starting point for flexible server rendering, from which we could build other similar directives that give us even more flexibility.
The key concept of the fine-grained Application Shell is that we want to be able to choose per page what parts of it are not rendered on the server, without compromising client functionality.
Understanding The State Transfer API
With the App Shell in place, let's now talk about another common server-side rendering optimization: server-to-client state transfer at client startup time.
Let's talk first about the problem that the State Transfer API solves. When our Angular Universal application starts, a large part of the page was already rendered and is visible to the user from the beginning.
But let's remember that this server-side rendered application is going to pull from the server a normal client-side application, which is then going to take over the page.
This Angular client-side application is then going to startup, and what is the first thing that it will do? It's going to contact the server and fetch all the data again!
The client-side application will even turn on loading indicators as the data get's loaded. This is strange to the user because the page that came from the server already had data in it, so why is the application loading it again?
The client side will then re-render all the data and pass it again to the page and show it to the user.
There is one problem with all this: the server just retrieved the data and rendered it, so why repeat the same process again on the client? This is redundant, it queries the server twice and does not give a good user experience, which is the main reason why we are using Universal in the first place.
How does the Transfer API work?
In order to solve this problem of duplicate data fetching, what we need is a way for the universal application to store its data somewhere on the page, and then make it available to the client application, without calling the server again.
And this is exactly what the State Transfer API allows us to do! The State Transfer API provides us with a storage container for easilly transfering data between the server and the client application, avoiding the need for the client application to have to contact the server to get the data.
To see this in action, let's give an example of a server call made in a Router Resolver that could cause the initial problem:
This Router Resolver is taking a course identifier from the current url, and it's using it to get some data from the server. The data will then be available via the router to all components.
Let's now say that we are navigating to a route that triggers this resolver. The problem with this implementation is that in the case of a universal application the data fetch call findCourseById() will be triggered twice: once during server rendering and the other on the client when the client application starts and the router kicks in.
In order to avoid this, we are going to refactor this Router Resolver and implement it using the State Transfer API:
There is a lot going on here, so let's break down this implementation step by step. First, let's look at the injected services:
-
we are injecting
platformId, in order to know if the resolver is being executed either on the client or on the server -
we are also injecting a new
TransferStateservice
The State Transfer API In Action
Here is how this works: first we are going to define a key that uniquely identifies a piece of state that we want to transfer between the client and the server:
Next, we are going to check if the course data that we need to emit is already on the state transfer container:
Let's start with the case when the data is not on the container: then in that case what we want to do is to fetch the data first, independently if we are on the server or on the client.
But if we are on the server, after fetching the data we also want to store it so that it gets transfered back to the client.
We can then populate the state transfer container by using the tap operator:
Now the data is stored in the state transfer container.
Where does the TransferState service store the data?
If you are curious to know where the state transfer service stores the data, its very simple: the data get's stored in the page itself!
If you inspect the page source that we get from the server, it contains a script tag at the bottom where the transfered data get's stored:

Fetching the Data from the State Transfer service
The next thing that we want to do in our Router Resolver implementation is to cover the client-side case. We want to retrieve the data from the state transfer service in case it's available, and bypass the server call.
Only the client application will find data inside the state transfer container:
If the data is present in the state container, we are going to fetch it and emit if directly using the of operator. Next, we are going to clear the data from the state container, therefore completing the state transfer process.
And with this, we now know what is the State Transfer API and know what problem it solves.
We have also finished turning this plain Angular Application into an Universal application! Let's now summarize all that we have learned and highlight the key points.
Code Samples - Github Repo
All the completed code used in this post is available here in this Github repository, in case you would like to run the application and see everything in action.
The code is deployable to Firebase Hosting (which will serve only the static bundles) and the server is deployable as a Firebase Cloud Function.
Conclusions & Summary
As we have seen, the main reason for using server-side rendering today is to improve the startup performance of our application, by sending at least some HTML to the browser when the application starts up.
The page will then load a client-side Angular application that will eventually take over the page as a normal SPA.
The added benefits of SEO for server-side rendering are less than they once were because the Google search engine now indexes well Javascript pages.
But large parts of the world use different search engines, so if we want to cover those as well then we need to use server-side rendering.
The main argument for using server-side rendering is performance and user experience, which also brings some indirect SEO benefits: faster pages are given a ranking boost.
Also, we have learned that depending on the application, rendering on the server might be only half the story! We also might need a way to control what gets rendered on the server or not (the App Shell), and to get that optimal user experience we will likely also need the State Transfer API.
I hope that this post helps with getting started with the Angular Universal and that you enjoyed it!
If you would like to learn a lot more about Angular Universal, we recommend checking the Angular Universal In Depth Course, where we cover Angular Server-side rendering and pre-rendering in much more detail.
If you have some questions or comments please let me know in the comments below and I will get back to you.
To get notified of upcoming posts on Angular Universal and other Angular topics, I invite you to subscribe to our newsletter:
If you are just getting started learning Angular, have a look at the Angular for Beginners Course:
