
One of the things that most impacts User Experience (especially on mobile) is the application startup experience, and perceived performance. In fact, studies have shown that 53% of mobile users abandon sites that take longer than 3 seconds to load!
And this is true for all applications in general, not only mobile applications. Any application can benefit from a much better startup experience, especially if we can get that working out of the box.
One of the things that we can do to improve the user experience is to show something to the user as quickly as possible, reducing the time to first paint.
And the best way to get that much-improved user experience and show something quickly to the user is to use an App Shell!
What is an App Shell?
To boost perceived startup performance, we want to show to the user the above the fold content as quickly as possible, and this usually means showing a menu navigation bar, the overall skeleton of the page, a loading indicator and other page-specific elements.
To do that, we will include the HTML and CSS for those elements directly in the initial HTTP response that we get back from the server when we are loading the index.html of our Single Page Application.
That combination of a limited number of above the fold plain HTML and styles which is displayed to the user as fast as possible is known as the Application Shell.
And in this post, we will learn all about how to add an App Shell to an Angular Application, using the Angular CLI!
Note: The App Shell functionality is available independently of the use of a Service Worker, and we don't need to use a server-side rendered Angular Universal application in production to benefit from the App Shell
Table Of Contents
Here is what we will do in this post: we are going to scaffold an Angular application from scratch from an empty folder, and we will add it an Application Shell that will be automatically generated at build time using the Angular CLI.
We will understand what is going on and how the whole App Shell solution works under the hood. We are going to do this in the following steps:
- Step 1 - Scaffolding an Angular PWA Application with the Angular CLI
- Step 2 - Checking the
index.htmlbefore including an App Shell - Step 3 - Profiling Application Startup Before an App Shell
- Step 4 - Scaffolding an Angular Universal Application
- Step 5 - Adding the App Shell using the Angular CLI
- Step 6 - Generating the App Shell in Production Mode
- Step 7 - Measuring the App Shell performance improvements
This post is part of the ongoing Angular PWA Series, here is the complete series:
- Service Workers - Practical Guided Introduction (several examples)
- Angular App Shell - Boosting Application Startup Performance
- Angular Service Worker - Step-By-Step Guide for turning your Application into a PWA
- Angular Push Notifications - Step-by-Step Guide
So without further ado, let's get started with our Angular Application Shell guided tour!
Step 1 of 7 - Scaffolding an Angular PWA Application with the Angular CLI
With a couple of commands, the CLI will give us a working application with an App Shell. The first step to create an Angular application is to upgrade the Angular CLI to the latest version:
npm install -g @angular/cli@latest
If you want to try the latest features, it's also possible to get the next upcoming version, not yet released:
npm install -g @angular/cli@next
And with this in place, we can now scaffold an Angular application. It's essential for the App Shell to work to have the Angular Router set up, and we will understand why in a moment.
We can include the router in the new application using the following command:
ng new my-app-shell --routing
And this will create a new folder named my-app-shell with a new Angular application which includes the Router already set up.
Step 2 of 7 - Checking the index.html before including an App Shell
In order to understand what problem the App Shell is solving, let's have a look at how the application works before including an App Shell.
Let's start by building this initial application in production mode:
ng build --prod
Now we have the production application in the dist folder. If we have a look at the index.html file, here is what we have:
As we can see, this page is a blank page that contains only the following:
- the application styles
- The Javascript bundles
This means that when this page is first loaded, for a few seconds the user will not see anything. There will be an initial browser paint, but it's not a meaningful paint: the page is empty!
All the content is going to be added to the page via Javascript, everything is dynamic content and there is no static content. Let's confirm this by starting the application and seeing what is going on using the Chrome Dev Tools.
Step 3 of 7 - Profiling Application Startup Before using an App Shell
Let's start the application in production mode:
ng serve --prod
Then we will go to localhost:4200 and measure the page startup performance:
- let's open the Dev Tools and select the Performance tab
- let's leave the "Screenshots" checkbox checked
- in the Performance tab, let's hit the "Start Profiling and Reload Page" button
- We stop the recording as soon as we see something on the page
Now let's have a look at the profiling results:
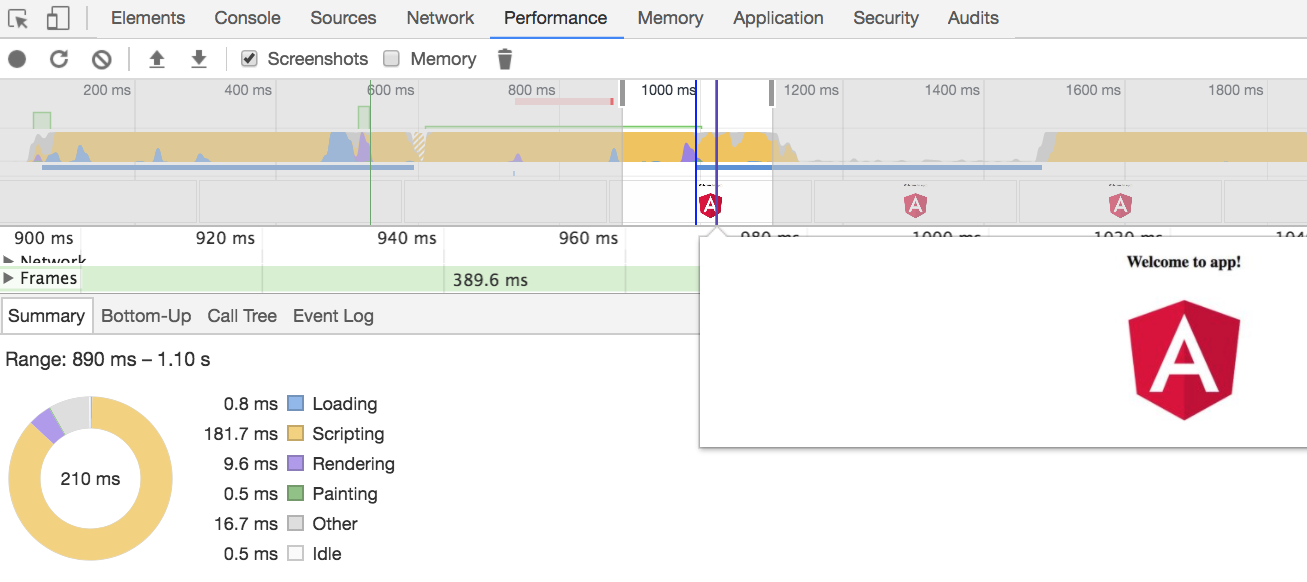
As we can see, the browser is rendering the page at about 1000ms (rendering is shown in purple). There was a first paint attempt at about 600ms, but the problem is that there was no content to be displayed yet, so the page remained blank.
And this is the best case scenario of a Hello World application, as a typical SPA will render the first results later than that!
Let's then see how we can improve this.
How to improve page startup time?
The only way to improve things is to serve some more HTML and CSS in the body of the index.html. This is because in this very early stage of page load Angular is not yet running and in fact, the Angular bundles are still being downloaded!
To do that, we would like to take at least a good part the content of app.component.ts main application component HTML and CSS output, and move it to index.html. This should include the main skeleton of the page, including the navigation system.
But if we look into the template of the component, we will see that it has a router outlet in it:
So we need to do is to pre-render this component, and get the HTML and CSS output for the App Shell, but we need to specify what we want to put in place of the router outlet.
What is the relation between the App Shell and Angular Universal?
We are going to pre-render the main component at build time using Angular Universal, and use the pre-rendering output in our index.html.
But in place of the router outlet, we probably want to put something lighter than the full content of the / home route, because that might include too much HTML and CSS.
Instead, in place of the router outlet, we probably only want to show a loading indicator or a simplified version of the page instead of the whole home route.
The simplest way to do that is to create an auxiliary route in our application, for example in the path /app-shell-path. Then we need to pre-render the complete content of that route and include it in our index.html, and we have our App Shell!
In order to do pre-rendering in Angular, we will need Angular Universal. Let's then scaffold an Angular Universal application, that contains the same components as our client-side single page application.
Step 4 of 7 - Scaffolding an Angular Universal Application
We can add pre-rendering capabilities to our application, by running the following Angular CLI command:
ng generate universal ngu-app-shell --client-project <project name>
We can find the client project name inside the angular.json CLI configuration file. Let's remember that now a CLI application can contain multiple client projects, so we need to identify the correct one.
And here is the command output:
CREATE src/main.server.ts (220 bytes)
CREATE src/app/app.server.module.ts (318 bytes)
CREATE src/tsconfig.server.json (245 bytes)
UPDATE package.json (1353 bytes)
UPDATE angular.json (3677 bytes)
UPDATE src/main.ts (430 bytes)
UPDATE src/app/app.module.ts (359 bytes)
added 3 packages and removed 3 packages in 10.619s
As we can see, this command added a new build configuration entry in the Angular CLI angular.json configuration file, introducing a new application named ngu-app-shell.
How can we use the Angular Universal application?
This means that now we can pre-render our application using renderModuleFactory. Pre-rendering can be used in multiple ways, for example:
- we can use pre-rendering in a backend Node server like Express (see instructions), to serve fully server-side rendered routes directly to the browser.
- Angular will then bootstrap itself and take over the page as a normal SPA
- or we can call pre-rendering from a command line tool, and build a plain HTML version of a page that we then upload and server from a CDN like Amazon Cloudfront
In our case, we are going to use pre-rendering as a command line tool, by pre-rendering the HTML and CSS of our App Shell.
Step 5 of 7 - Adding the App Shell using the Angular CLI
We can add an App Shell to our application using the following command:
ng generate app-shell my-loading-shell
    --universal-project=ngu-app-shell
    --route=app-shell-path
    --client-project=<project name>
Let's break down this command to see what is going on:
- we are generating an App Shell using
ng generateand giving it a name - we are configuring via the
--universal-projectoption which Angular Universal application we want to use to do the pre-rendering, from the potentially multiple options available inangular.json - we are configuring which route do we want to fully pre-render using the
--routeoption, as our application can have many routes configured and the/home route is not necessarily a good default.
What does the ng generate app-shell command do?
Lets have a look at the command output:
CREATE src/app/app-shell/app-shell.component.css (0 bytes)
CREATE src/app/app-shell/app-shell.component.html (28 bytes)
CREATE src/app/app-shell/app-shell.component.spec.ts (643 bytes)
CREATE src/app/app-shell/app-shell.component.ts (280 bytes)
UPDATE angular.json (3940 bytes)
UPDATE src/app/app.module.ts (425 bytes)
UPDATE src/app/app.server.module.ts (599 bytes
As we can see, we have just created a new component called app-shell! This component was then linked to the /app-shell-path route, but only in the Angular Universal application.
This /app-shell-path special route is just an internal Angular CLI mechanism for generating the App Shell, the application users will not be able to navigate to this route. In this case, this route is a build time auxiliary construct only.
Here is the routing configuration that was added only in the app.server.module.ts file (and not on the main app.module.ts):
As we can see, the /app-shell-path route is linked to AppShellComponent, which will be added in place of the router-outlet tag. The AppShellComponent is a normal scaffolded Angular component, just like any component that we obtain using ng generate.
We can edit it to include the content that we would like to display in the body of the App Shell. Here is an example that uses a loading indicator:
Besides configuring the App shell route and component, we also have some new configuration in the angular.json file:
As we can see, we have added to the build configuration of our production Angular application some configuration that says:
Pre-render the route
app-shell-pathusing the Angular Universal application namedngu-app-shell, and use that as the App Shell
So everything is setup and ready to go, let's then build our application, see it in action and measure the performance improvements.
Step 6 of 7 - Generating the App Shell in Production Mode
Let's now run the app shell build! Let's say that your project is named app-shell-test, which is the value specified on top of your angular.json file.
We can now build the App Shell by running the following command:
ng run app-shell-test:app-shell
This time around, the content of index.html generated in the dist folder looks a lot different. Let's have a look:
As we can see, this is no longer a blank page. The styles for the AppShellComponent were added inline in the page (as usual), and the HTML for the navigation menu and the loading indicator is also present on the page.
So what happened here? The Angular CLI has taken the output of pre-rendering the App shell route, and it added that HTML output inside the index.html file.
So it looks like everything worked, and we have an App Shell ready to use!
Step 7 of 7 - Measure the performance improvements gained by using the App Shell
Let's now run our application in production mode and see the results. We can run a build that is as close to production by running:
ng serve --prod
We can also do the following, let's cd into the directory and run the application using a simple HTTP server:
npm install -g http-server
cd dist
http-server -c-1 .
App Shell Performance Results
With the server running, let's head over to localhost:8080 and do some profiling. Let's see how soon is the app shell visible to the user:
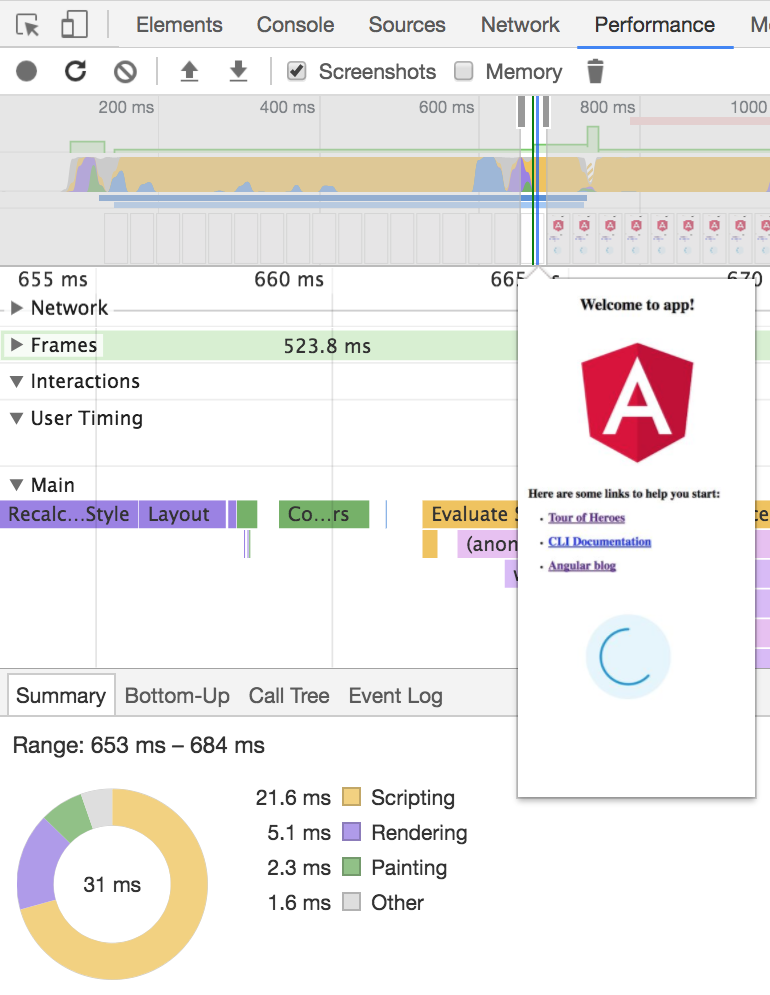
A much improved time to first paint
As we can see, in this particular case the App Shell is visible at around 660ms, which represents a huge improvement to the typical time to first paint of a full SPA, which could be a couple of seconds!
Even in the case of this Hello World example we have a time to first paint that is almost half the initial time, so imagine the gains in a full-blown SPA.
This can be even further improved in several ways:
- by using an inlined Base 64 image for the loading indicator instead of an external image, avoiding an extra HTTP request needed to load the image
- by moving or even duplicating certain styles from external stylesheets to the App Shell, etc.
Each application needs to be optimized separately depending on how much content do we need to show to the user, and the App Shell mechanism gives us the foundation for doing that and achieving that super fast perceived startup time that we are looking for.
Summary
The built-in App Shell mechanism in the Angular CLI is a hugely beneficial performance improvement for any application (not only mobile), that is working right out of the box.
From the user perspective, a time to first paint of about half a second just feels almost instantaneous, even though in reality the application is still loading and fetching data from the backend.
The exact time to first paint will depend on each application, and the App Shell feature gives us all the tools needed to get it as low as possible.
Although this App shell mechanism is usually tied to PWAs, a PWA is not necessary to benefit from the App Shell Angular CLI features, as these two progressive improvements are configurable separately.
I hope that this post helps with getting started with the Angular App Shell and that you enjoyed it!
If you would like to learn a lot more Angular Progressive Web Applications, we recommend checking the Angular PWA Course, where we cover PWAs in much more detail.
If you want to learn more about other Angular PWA features, have a look at the other posts of the complete series:
- Service Workers - Practical Guided Introduction (several examples)
- Angular App Shell - Boosting Application Startup Performance
- Angular Service Worker - Step-By-Step Guide for turning your Application into a PWA
If you have some questions or comments please let me know in the comments below and I will get back to you.
To get notified on upcoming posts, I invite you to subscribe to our newsletter:
Other posts on Angular
Have also a look also at other popular posts that you might find interesting:
- Getting Started With Angular - Development Environment Best Practices With Yarn, the Angular CLI, Setup an IDE
- Why a Single Page Application, What are the Benefits ? What is a SPA ?
- Angular Smart Components vs Presentation Components: What's the Difference, When to Use Each and Why?
- Angular Router - How To Build a Navigation Menu with Bootstrap 4 and Nested Routes
- Angular Router - Extended Guided Tour, Avoid Common Pitfalls
- Angular Components - The Fundamentals
- How to build Angular apps using Observable Data Services - Pitfalls to avoid
- Introduction to Angular Forms - Template Driven vs Model Driven
- Angular ngFor - Learn all Features including trackBy, why is it not only for Arrays ?
- Angular Universal In Practice - How to build SEO Friendly Single Page Apps with Angular
- How does Angular Change Detection Really Work ?